Meet Pi: The Minimalist, Anti-Bloat AI Coding Agent You Didn’t Know You Needed
If you’ve spent any time working with modern AI coding assistants, you’ve likely noticed a frustrating trend: they are rapidly evolving into unwieldy, feature-bloated “spaceships.” They impose rigid workflows, dump 18,000-token system prompts into your context window before you even type a word, and often prioritize “vibe slop”—unsupervised agent swarms generating thousands of unreviewed lines of code—over maintainable software architecture.
Enter Pi (hosted at pi.dev), an open-source AI coding agent and terminal harness built in TypeScript and Node.js. Pi takes a radically different approach. It is not an opinionated consumer app; it’s a lightweight, transparent foundation designed to adapt to your workflow, not the other way around.
Here is a comprehensive guide to what makes Pi tick, its core philosophy, and a full tutorial on the commands and workflows you need to master it.
The Philosophy of Radical Minimalism
Pi is built on a few core tenets that push back against the current meta of heavy AI coding tools:
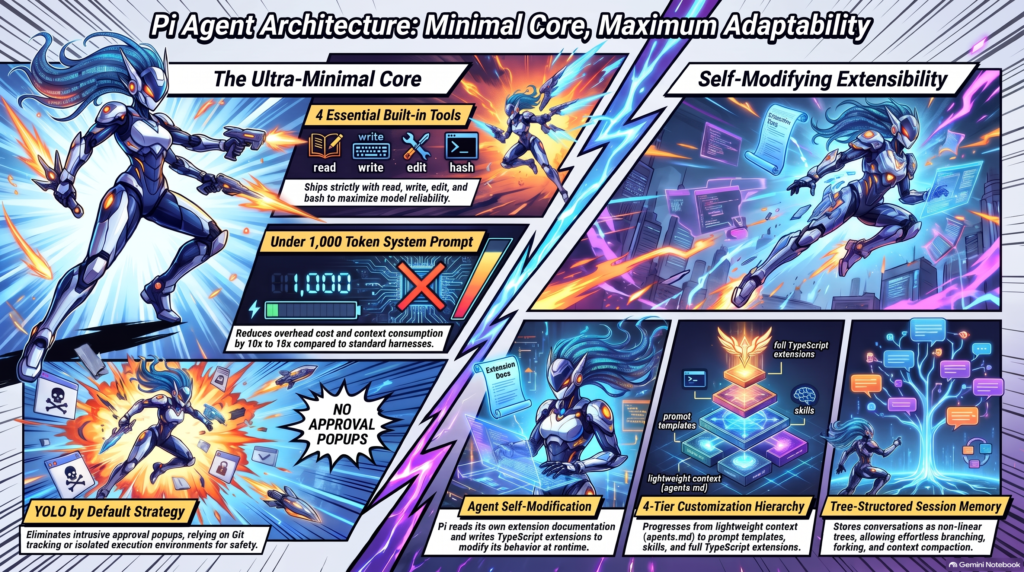
- A Tiny Core: Out of the box, Pi provides exactly four tools:
read,write,edit, andbash. Its base system prompt and tool definitions fit in under 1,000 tokens. There is no built-in Model Context Protocol (MCP) bloating your prompts, no hidden autonomous sub-agents, and no built-in “plan mode.” - “YOLO by Default” Over Security Theater: Pi executes commands without confirmation prompts by default. Why? Because repeated permission dialogs merely create click-fatigue, leading developers to blindly approve prompts anyway. If you want safety, Pi encourages genuine boundaries like Git, containers, or custom permission gates tailored to your specific infrastructure.
- Anti-“Vibe Slop” and Human Agency: LLMs compound local errors globally if left unchecked. Pi treats the agent as a “bicycle for the mind.” The human remains the system architect; the agent explores solution spaces, handles boilerplate, and assists with refactoring within well-defined constraints.
- Start with the Least Powerful Tool: Customization is encouraged, but layered. You start with simple markdown instructions (
agents.md), move to Prompt Templates, then to modular Skills, and finally to executable TypeScript Extensions.
Architecture: The Tree-Based Agent Loop
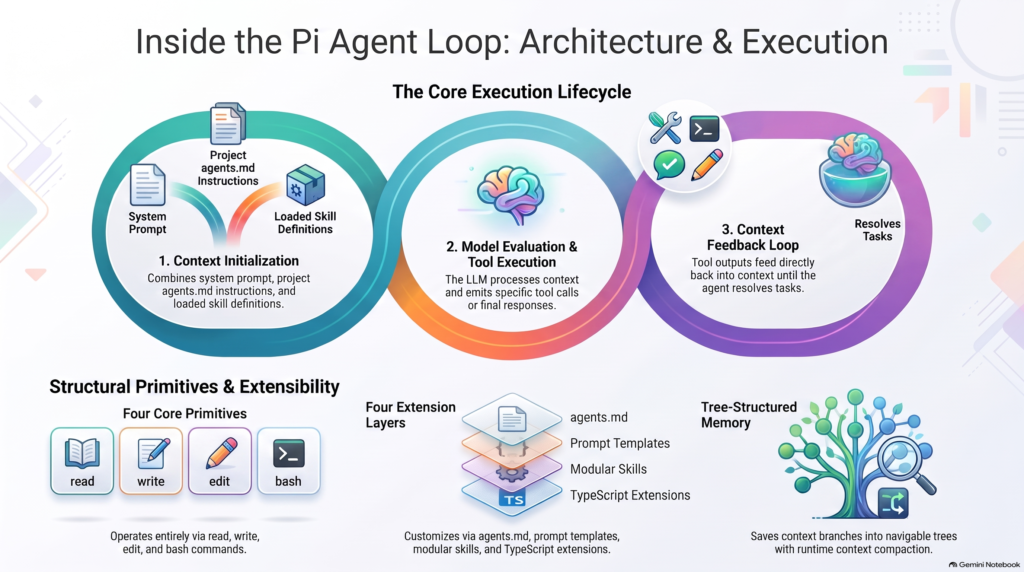
Unlike monolithic setups, Pi’s monorepo cleanly splits into four packages: pi-ai (provider abstractions), pi-agent-core (the loop), pi-tui (a custom, non-flickering terminal UI), and pi-coding-agent.
The heart of Pi is its Agent Loop. When you submit a prompt, Pi assembles its <1,000 token system prompt, your agents.md rules, and your active branch history. If your context is getting bloated, Pi automatically runs a compaction check, compressing older conversation turns into structured summaries to free up tokens.
Tree-Based Session Branching: This is Pi’s most powerful architectural feature. Conversations are not stored as linear lists; they are saved as JSON-L trees. You can visualize your conversation, jump back to any previous prompt, create branches, or fork off entirely new sessions without losing your original context.
Tutorial: Installation & Initial Setup
Because Pi is so lightweight, getting started takes seconds.
Prerequisites: Node.js v22.19 or newer.
Installation:
Bash
# Install globally via npm
npm install -g @earendil-works/pi-coding-agent
First Run & Model Connection: Navigate to your project root (which sets Pi’s working boundary) and type:
Bash
pi
From the interactive prompt:
- Type
/loginto connect your API keys (OpenAI, Anthropic, Google, etc.) or local providers like Ollama. - Type
/modelto select your active model. - Press
Ctrl + Sin the picker to save it as your persistent default.
The Ultimate Pi Command & Shortcut Tutorial
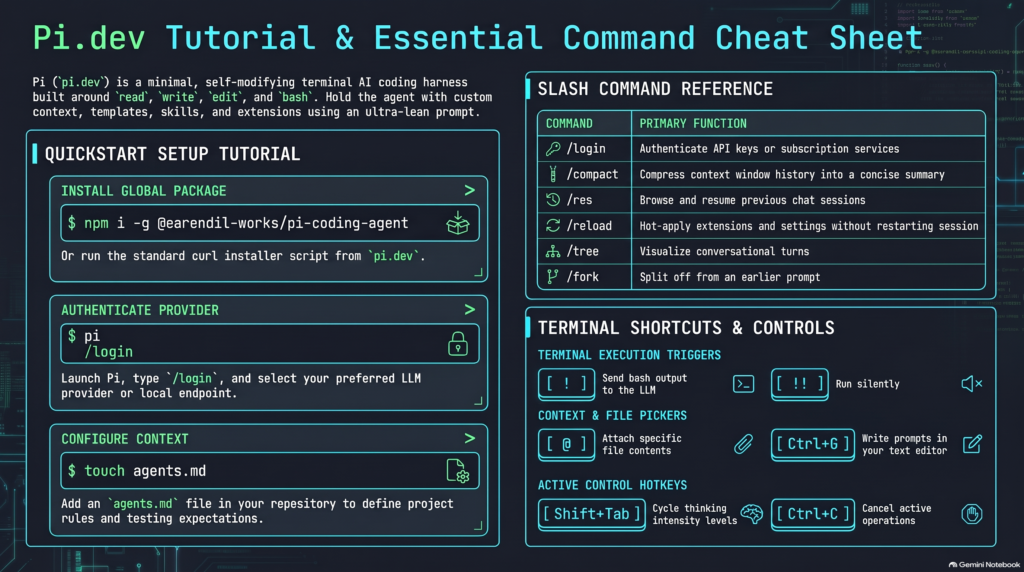
To get the most out of Pi, you need to navigate its TUI efficiently. Here are the essential commands and shortcuts to drive the agent.
Session & History Navigation (Slash Commands)
Pi’s tree-based history gives you version control for your conversations.
/tree– Visualizes the conversation tree. Jump to any earlier message, edit it, and branch off (with or without an AI-generated summary of the abandoned path)./fork– Splits off from a previous user message into a brand new conversation session file./clone– Duplicates the current session at its exact point in time so you can experiment safely on a copy./resume(or/res) – Opens an interactive picker of past sessions for the current folder./new– Clears the active context and starts a fresh conversation in the current directory./name <name>– Assigns a custom name to the active conversation to easily find it later./compact– Manually compresses older conversation turns into a structured summary (retaining goals, file paths, and key decisions) to free up token capacity./session– Displays real-time session statistics: total messages, token usage, cache hit rate, and monetary cost.
In-TUI Keyboard Shortcuts & Input Syntax
@filename– Type@in the editor to bring up a fuzzy file search. This injects the file’s contents directly into your prompt.!– Executes a local bash command and pipes the output into the conversation context for the model to see.!!– Executes a local bash command quietly without sending the terminal output to the model (ideal for committing with git).Shift + Tab– Cycles reasoning/thinking effort between off, low, medium, high, and max (for models like DeepSeek-R1).Ctrl + P– Cycles through your configured models on the fly.Ctrl + L– Opens the model selection list.Ctrl + G– Opens your current multi-line prompt in an external text editor (like VS Code) and pastes the result back into Pi upon saving.Ctrl + O– Expands or collapses full tool outputs and execution details in the chat viewport.Ctrl + T– Toggles the visibility of thinking and reasoning traces.Alt + Enter– Queues up follow-up prompts to execute sequentially once Pi completes the current turn.Escape– Press once to interrupt the current generation. Press twice to jump back to previous prompt messages in the session tree.
Useful CLI Flags
You can run Pi directly from your shell outside interactive mode:
pi -c(or--continue) – Resumes the most recent conversation session in the current directory.pi -p "<prompt>"– Executes a one-off headless prompt, prints the answer to stdout, and exits immediately. Great for shell scripts.pi install <package-name>– Installs community extensions from npm or GitHub.
Building Your First Project
Pi looks for an agents.md file at the start of every session to establish project rules. You don’t even have to write it yourself. Just ask Pi:
“Create an agents.md file for this project: Node.js CLI tool, ES modules, no external dependencies, and specify that npm test runs unit tests.”Once configured, give Pi a multi-step task with clear constraints:
“Build a CLI flashcard app called study-deck that reads notes and runs a spaced-repetition quiz. Put scheduling rules in scheduler.js and write unit tests for the intervals. Run tests once at the end.”Pi will autonomously read, write, run bash commands, and test the code. You can press Ctrl + O to watch the internal tool execution in real-time.
Extending the Agent
Because coding agents can read documentation and write code, Pi is designed to extend itself. You can instruct Pi to write a custom TypeScript extension, and it will hot-reload it immediately in the running session without restarting.
Popular community extensions (installable via pi install npm <package-name>) include:
- Web Access (
pi-web-access): Adds fast web search, fetching, GitHub repository cloning, and PDF extraction. - Safety Gates (
pi-permission-system): For those who want guardrails on “YOLO mode,” this intercepts dangerous bash commands and pops up interactive TUI approval prompts. - Multi-Agent Orchestration (
pi-subagents): Spawns modular sub-agents (scout, oracle, worker) for complex workflows. - Tool Adapters (
pi-mcp-adapter): A lightweight proxy that exposes MCP servers to Pi as callable tools without permanently bloating your base context.
The Perfect Match for Local Models
Setting up Pi with lightweight, local open-weights models (like Qwen 2.5 Coder, Gemma 4, or Llama 3) is where the architecture truly shines. Because Pi’s base context is under 1,000 tokens, you avoid the immediate context exhaustion that plagues heavy consumer harnesses.
If you are running a modern local setup—whether you’re leveraging an M2 MacBook or pushing the limits of a 32GB Snapdragon X2 Elite machine for local inference—Pi’s minimal footprint leaves maximum system memory and VRAM available for your actual LLM and its KV cache.
For local inference, llama.cpp is highly recommended for granular hardware control, though Pi connects seamlessly to Ollama (http://localhost:11434/v1) or LM Studio via OpenAI-compatible endpoints configured in your ~/.pi/agent/models.json file.
When using smaller models, remember to scope your tasks aggressively. Define module boundaries upfront, run /compact regularly to prevent context bloat, and consider using the “Advisor Pattern”—where a fast local model handles boilerplate and file reading, while you occasionally swap to a frontier model (via Ctrl + P) to review complex architectural diffs.
A True Bicycle for the Developer’s Mind
Pi proves that AI coding agents do not need to be heavy, opaque, or overly opinionated to be effective. By offering a rock-solid, programmable core with a tiny context footprint, Pi allows developers to mold the AI to their exact habits. Whether you are orchestrating an ensemble of local models or just looking for a fast, terminal-native pair programmer that gets out of your way, Pi is a blueprint for the future of developer tools.